Basic Level state
Each level can be in many different states, however, high level game and level progress is linear and so, while game state could be represented as node graph, game states in Consigned to Oblivion are really only ever dependant on a single preceeding state. Low level (Level -> Objective) can be represented as a list of boolean flags, while on High level (game -> level) completion is states need a level complete flag, and with a flat list of flags. Combining this
We initially had a level design pattern where each level was split into 3 specific sections Intro -> Puzzle -> Exit and resuming gameplay should resume at the start of the area you left from. For a level to be complete it is only a matter of checking if the Exit for a specific level is completed. However, after the system had been created we changed direction. Due to time constraints and a miscommunication of high level design concepts, we pivoted to a single scene per level still using the Exit flag as completion status.
Level Architecture
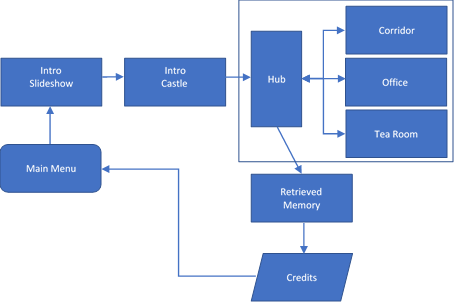
On a Higher level, the game uses a hub type archetechture.

While this may not look exactly linear, it actually is. Since each level can only be completed in the prescribed order, the trips back to the hub mean nothing in terms of data requirements.
Storing States
As I had established the level structures were going to be linear, I went about figuring out how to put together a system of saving this.
I decided that it would be best to just start with a flat objective system and use that for both sets of data and any other flag based objectives we needed.
Data was held in a List<Objective> where Objective is simply a data container.
        public class Objective{}
        {
            public bool StatusComplete { get; set; }
            public string Name { get; set; }
        }
Later, this was expanded to be multidimentional, a List<Level> so that each level could use the same objective status and not have data collisions. the container class for this LevelCollection became a scriptable object so we could store/setup objectives in the editor and reference them mroe easily.
        public class Objective{}
        {
            public LevelName Level {get; set;}
            public bool StatusComplete { get; set; }
            public string Name { get; set; }
        }
Saving States
The LevelCollection above is a concrete implementation of a generic savable class SaveableGameData<T>. SaveableGameData<T> is a scriptableobject and takes care of serialisation and deserialisation of any List of data. It acts as a generic data container so we can use this for both objectives and for any other (say config) data wee need. The implementation just needs to tell the container when to save/load and a filename. It was created initially to save configuration data, but with a little manipulation it became be base for our serializable objectives too.
The final data container for objectives is LevelCollection : SaveableGameData<Level>where Level is itself a container for objectives.
LevelCollection:
    public abstract class SaveableGameData<T> : ScriptableObject where T :class {

        /// <summary>
        ///     The serializable data to save/load
        /// </summary>
        [SerializeField]
        protected List<T> Data = new List<T>();

        /// <summary>
        /// Delete the file associated with this data
        /// </summary>
        /// <param name="filename">filename of file to delete</param>
        /// <returns>true if file was removed or does not exist</returns>
        protected bool Delete(string filename) {
            if (!File.Exists(GetFilepath(filename))) {
                return true;
            }

            try {
                File.Delete(GetFilepath(filename));
                return true;
            }
            catch (Exception e) {
                Debug.LogError(e);
                return false;
            }
        }

        /// <summary>
        ///     Loads data from a file />
        /// </summary>
        /// <param name="filename">Name of the file to load from</param>
        /// <typeparam name="T">Data type to be deserialised</typeparam>
        /// <returns>true if succeeded</returns>
        protected bool Load(string filename) {
            var filepath = GetFilepath(filename);
            if (!File.Exists(filepath)) {
                return false;
            }

            var binaryFormatter = new BinaryFormatter();
            var file = File.Open(filepath, FileMode.Open);
            Data = (List<T>) binaryFormatter.Deserialize(file);
            file.Close();
            return true;
        }

        /// <summary>
        ///     Saves data to <paramref name="filename" />
        /// </summary>
        /// <param name="filename">Name of the file to save to</param>
        /// <returns>true if succeeded</returns>
        protected bool Save(string filename) {
            try {
                var binaryFormatter = new BinaryFormatter();
                var file = File.Create(GetFilepath(filename));
                binaryFormatter.Serialize(file, Data);
                file.Close();
                return true;
            }
            catch (Exception e) {
                Debug.LogError(e);
                return false;
            }
        }

        private static string GetFilepath(string filename) {
            return Application.persistentDataPath + "/" + filename;
        }
    }
}
UI / Inspector
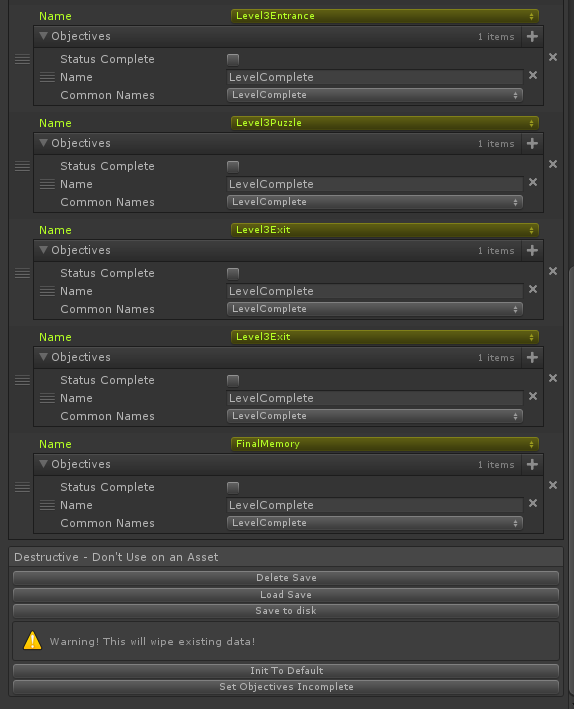
As with anything I build for others to use, I want users to be comfortable, have a good experience with it and most of all, it needs to be usable. Writing editor code is usually painful, but for this project I've been using Odin Inspector. Odin carries a host of Attributes that can be used to layout an inspector nicely without the hours spent reloading assemblies. In the instance below, we have buttons for testing/setting data, and drop down lists of previously used objective names to make objective creation simpler.
An example usage for one of the buttons below is
        /// <summary>
        ///     Reset to defaults (Editor button)
        /// </summary>
        [Button][InfoBox("Warning! This will wipe existing data!",InfoMessageType.Warning)][BoxGroup("Destructive - Don't Use on an Asset")]
        private void InitToDefault() {
            Data = new List<Level>();
            foreach (var n in Enum.GetValues(typeof(LevelName))) {
                var o = new Level((LevelName) n);
                o.InitDefault();
                Data.Add(o);
            }
        }

Notes
We initially made a mistake with saving individual level data, but when we fixed that we found that we actually prefered the idea of loosing progress between each level. Playing a puzzle needed to mean playing the whole puzzle start to finish. The Hub area is now the only area with a persistent/changing state.